Thursday, May 31, 2012

Finished placemats (and some napkin rings)

You guys left me so many nice comments yesterday, I feel ashamed at being so hard on myself! Thank you! You all are too nice. :)

I finished up both place mats, and after taking some advice from Jen, who said to go around the circles twice to hide any of the imperfections, I think the second one (shown below) turned out pretty nice.
When it comes to quilting, my favorite parts of the process are coming up with the design, choosing the fabrics, quilting the layers together, and the binding. I really love sewing on binding. It's the last stop, the finishing touch, and I get more joy and satisfaction out of binding than I'd admit to anyone but you guys. I should have sewn this one on by hand, but I mean... it's just a place mat. :)

(For the record, I hate spending large amounts of time cutting and I don't really care for ironing, but it's necessary drudgery. I wish I had an ironing fairy! Or cutting elves.)

I loooove the fabric I used for the binding, I might need to get some more of it. I think it would work with a lot of different color schemes.

When I was done (and my sewing room looked like (still looks like) a tornado went through, scraps of fabric everywhere, threads hanging from every surface in sight) I decided to use some leftovers to make matching napkin rings. Not that I ever actually use napkin rings, but you know... they're cute! lol

Someday I'll have to tell you the story of my dining room table - I made it myself and it was a lot of work (..that's pretty much the story) so don't even think about putting your glass down without a coaster! LOL I'm actually a really messy person and being careful or keeping things nice and/or clean is the last thing you'll see me doing. (That's my fiance's specialty! He's a clean freak!) :P Just don't mess with my table. I'll set my cutting elves on you. Okay, too much.


Conclusion:
  • Pebbling is hard at first, but once you get a rhythm going it's not so bad.
  • Pebbling uses a ton of thread
  • Pebbling takes forever
  • Pebbling looks really pretty!
  • I will probably never use pebbling on a quilt!
So now I'm back to working on my wonky square ring blocks.  And I still need to think of what do with the beautiful Poetica fabric I bought! There are so many quilt designs I want to try, I can't make up my mind. :)

Wednesday, May 30, 2012

WIP Pebbling Place mats experiment

Warning!  I'm getting all reals on you guys - ugly quilting ahead. If you're ready for this jelly, read on.. :)

As I've been working on my wonky square ring blocks (another WIP, coming along pretty well), I've been thinking about how I'm going to do the quilting. I'd like to expand my FMQ skills. I can do a decent meander/stipple, but I'd like to try something new. I've always really loved the look of pebbling, so I thought I'd give it a go on a small project. 

Place mats are a good idea for me because I'm a slob. At dinner last night my fiance had to inform me I had A1 sauce all over my white tank top. Smooth! Lol. Since this is just practice, if I make a terrible place mat I won't feel bad slopping food all over it.

I went through my stash and pulled out some dark fabric so I could see my work. I started with a bit of a tension problem on the lower right, but ended up fixing it.


Here is where I need some advice! Just looks at this mess. LOL. When I was doing the pebbling, it seems my hands were working a lot faster than my brain. My brain got sort of stuck sometimes and didn't know where to tell my hands to go, so I'd end up making an awkward leap to another area, and the pebbles didn't end up looking right. The "brain and hands out of sync" thing usually is okay with meander, this was trickier.

The photo below shows how they looked when I first started pebbling.. not pretty.


And this photo below shows my work towards the end of the place mat after a bit of practice... the pebbles are bigger and more uniform.


The fabric I'm using for the binding is this colorful print from Hobby Lobby.


So I'm not totally sold on pebbling. I'm going to finish up this place mat and make another and see how I feel. It's very time and thread consuming!

Has anyone done pebbling? Do you have any tips? Is it just a matter of practice makes perfect?

Linking with Freshly Pieced , thanks for visiting - I'll be stopping by everyone's WIP's after work!

Friday, May 25, 2012

DIY Double chaise lounger and cushion

Happy Friday! Today I've got some non-quilting crafty stuff for ya. Last night I finished sewing a cushion cover for our new double chaise lounger and I think it's pretty cool! Far from perfect, but pretty cool. :)

I really enjoy woodworking, and I've done quite a bit of it around our house. But today I give all the credit to my fiance. He built this for us using this plan from Ana White. She is all over the blog world, so I'm guessing you've heard of her, but if not - definitely worth checking out. She has tons of free plans and they are super simple to follow.
It took a few days for him to build (not working the whole day), and we estimate it was about $70.00 for the wood, hardware and screws.  We used pressure treated pine, which I know is full of icky chemicals, but cedar wasn't in our budget so we made do, and since we have the cushion we won't be touching it too much. The back is adjustable to three positions and it can also lay flat.
Okay, here is where it gets ugly. Try searching for a double sized cushion under $200. I dare you, lol. Pottery barn sells some on clearance for $99.00, plus $50.00 delivery surcharge, PLUS $17.00 shipping! Sheesh! I looked everywhere, no luck. We ended up buying two regular chaise cushions from Walmart for $30.00 each. (Shown above on the lounger before it got stained.) I didn't really care for the way they look, or the fact that they were two separate cushions, so I made a sort of giant pillowcase for them both to lay inside.
I bought a sheet at the thrift store, (wash and bleach it!), and sewed it along three sides. I left the fourth side open for the cushions to slide in, and sewed four buttons to keep it closed. The cushions have long ties attached to them that can peep through and tie down to the back of the lounger.

We only take the cushion outside when we're using it, so we don't have to worry about the weather or bird poops. Plus we can just take it off and wash it when it gets gross.
In total, it was about $130.00. It's hard to find anything new in the stores for even close to that price!
We knew we didn't want to have to mow around the thing all the time, so we're going to leave it under a tree and mulch around a big area for the lounger to permanently stay. We aren't done with that yet, so no pictures of it in it's final home! :) The whole backyard is going through a transformation right now - thousands of pounds of rocks, yards and yards of mulch, probably a hundred plants. It's nuts. Wonderful nuts.
 So now I have another excuse to do nothing, be lazy and drink wine. And yes, that's a finished quilt in the above photo! I will show you more next week! Have a great long weekend. :)

I am linking and partying it up with Tatertots and jello. If you are swingin' by from there thank you for visiting me! It makes me happy. I will visit you, too! And now I'm gonna go ahead and open up a Blue Moon. Yum! :)

Monday, May 21, 2012

Wonky square ring block

Yesterday was a seriously lazy day. I've been a bit under the weather, so I did a lot of laying around, I drank some red wine (I know, I'm bad!) and watched Game of Thrones. :) How was your Sunday?

As you can see, I picked a design (!!!) for my red and blue fabric squares I cut out of the quilt top I found. I knew I wanted little rectangles, so it was just a matter of how I would piece them together. I'm sure this block exists somewhere out in quilterspace, but I did a quick look around and couldn't find anything, otherwise I'd link up some photos of what this might look like as a finished quilt.

It's pretty darn self explanatory so I'll just quickly show ya what I'm doing..

I'm planning on a 56" x 56" square quilt. That'll be 16 blocks (4x4 arrangement) and each finsihed block will be 14" square.
I cut up 2" x 3" (approximately) rectangles, and I'll need about 30-35 per block.
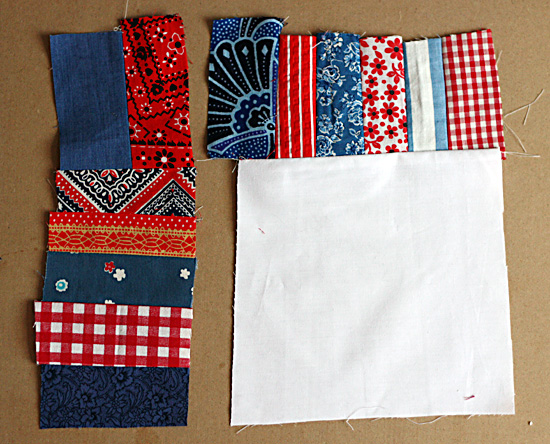
I started with a white block, which I purposefully cut wonky. I figure the blocks will range from 4" to 6" in any dimension, and I'm hoping to make them all different. Then I planned to sew a row of rectangles together and attach it to one of the sides of the white square.
Here is where I got myself into trouble! For whatever reason, the beans knocking around in my brain wanted the block to look like figure "A" above. Looking back I don't know why, I just thought it made sense! I should have realized that figure "B" above makes much more sense, is way easier to sew, and would be the obvious choice for anyone with correctly functioning beans in their brain.

Can you think of a magical (ie easy!) way of making block A?
I sewed my first block (above) the dumb way and it just made things much harder on myself, because I had to match up the seam to make it appear that the blocks on the top went all the way across.
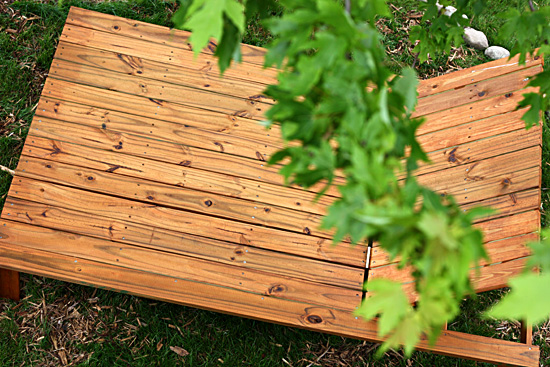
It looks nice, but not worth the extra work. The second block I did (the block shown at the very top of the post) I made the easier way, and I think it looks just as nice. It's a really quick block to make, too!
Isn't it fun taking pictures outside on a windy day! LOL I'm just glad none of the neighbors were outside!

Edit! [Wednesday May 23rd]
I'd like to link this up to Lee's website, Freshly Pieced, as a "Work in Progress." Since I bought some new fabric for the quilt and made a new block, I thought I'd add some more pics:

I want to keep this quilt as low-budget as possible, and use all of the red and blue from the original quilt top I cut up. When I did some quilty math, I figured there wasn't enough fabric, so I bought 6" of each of these prints. It ended up being $12.00, hooray! I think they will mix nicely with what I already have. Just 13 blocks to go! :P
Thank you so much for taking the time to stop by and check up on what I'm doing! :)

Saturday, May 19, 2012

Quilting on a budget


I love this scene in Bridesmaids. (If you haven't seen this movie, ya should!) Whenever I click lustfully around the fabric shops online I hear myself saying "Help me, I'm poor!" LOL! I'm not really poor. But if I'm not careful, this quilting hobby can get to be very expensive!

Let's think about this for a second! (Ew math! Ahh..) A 60"x60" quilt might use..
  • 3 yards of fabric on the top @ $10.00/yard for designer beautiousness
  • batting @ ... maybe $10 bucks if you're like me and just use warm n white with a Jo-Ann's coupon
  • 3 yards of fabric on the back @ ??? Maybe you go cheaper on the back, let's just go with $5.00/ yard
  • 1/2 yard for the binding... I'll go with $5.00/yard again
  • thread...
That's $60. And yeah, this is just based on my experience and of course the numbers are different for every quilt. But it's pretty easy to spend big moolah on one single quilt. If you want to make a few quilts a month you are almost making a car payment. Okay I'll stop being annoying now. :)

This is what's been going through my mind when thinking about what my next quilt should be. I've recently bought some really pretty fabric that I can't decide what to do with. I can't cut into this stuff until I'm really, really sure I won't change my mind! But I'm still itching to quilt, and I don't have a huge fabric stash, so for now I've been working on cutting up the rest of the quilt top I showed you guys the other day that I bought for just a few dollars at an antique store. I bought it so long ago it's like quilting for free. :)

I've sorted the fabric into colors and found that there is a lot of red, and a lot of blue.

I really like the way the reds and blues look together, and since summer is quickly approaching my plan is to start a scrappy "picnic" quilt, you know, for BBQ's, naps, and of course, fourth of July fireworks! :) haha That sounds so nerdy.

Anyway, I think I'll cut each one into two rectangular pieces and chain them all together, then sew them into random rectangles sizes and then sew that up with some blocks of white. (Phew!) I really want to make it completely random and very modern. And cool.
I also ended up with a lot of browns. I'm going to save these colors and use them for inspiration in the fall.
This print made me think about a certain set of prints that I want, I really, really want...

Seriously, who doesn't already have flea market fancy or want it? Sigh... so pretty! I think the brown print above looks like it could be part of the fall bundle.


Some other prints I cut out of the the top...
And last but not least, the pile of rejects - yuck. Maybe I can use these somehow, but I'm really not sure. I'll save them just in case. :)

So anyhow, how do you guys afford the habit?

Thursday, May 17, 2012

Irish Hills Patchwork Quilt

I posted this yesterday, and only recently found out about the Bloggers Quilt festival, hosted by Amy's Creative Side. I hope it's okay to enter this quilt! :) I thought this might be a good way to get out into the blogosphere and meet some new quilting bloggers. So thanks for stopping by - here we go!
Mom mom lives in an area of Michigan that people call "the Irish hills". I don't know why it's named that. Well, it does have rolling hills, and I just googled it - apparently it was settled by the Irish. Now I know! In any case, it's really beautiful and the downtown area is charming, but if you get outside of town it's sort of "country", if you know what I mean. (Nothin' wrong with country! I'm actually living in the burbs, wanna-be-country style - I swear we are starting our own farmers market in the backyard, but that's another story..)

One of the first times my fiance and I drove there together, we stopped at a somewhat decrepit gas station/"everything" store to get some beer. We were the only people there, except for one guy at the register buying a case of Budweiser and having a very intense conversation with the cashier about night crawlers. I guess we looked like outsiders or something, because the guy eventually turned around and said to us (rather creepily, through the few teeth he had left) WELCOME TO THE HILLS! (Mm, thanks?!! lol) We felt like we were in a movie, but I guess you had to be there!
So yeah.. how does this all relate to the quilt?  It started it's life in "the Hills" - you could say that's where it was born, aww. I found a quilt top, in an antique store, that somebody (I wonder who?!) had started and never finished, and the price was right so I grabbed it and eventually used parts of it to make this large patchwork. I guess I'm taking someone else's history and pushing it forward?
Inspiration? Well, I gotta give some love to Film in the Fridge, as this quilt is one of my favorite's of hers!
I realized I didn't really care for this green color on the backing much too late, so now I just live with it.

Most of the fabric on the top didn't come from the found quilt top. I'd say only about 20% is from the antique store find.


So I'm left with much of the found quilt leftover - I am starting to think of how I can use the rest of the fabric. There is some WHACK fabric in there. I mean look at those neon stripes.
But there are some real gems in there - I especially love this aztekky looking print on the top left:
Maybe I will cut the rest into jelly roll type stripes, along with some solids and sew up one of those race-type quilts. Or maybe it'll sit in my craft room closet for a few years. :P

If you are still reading, thank you for checking out my quilt. I will be clicking on as many of you as I can this weekend!